S13/S14/Z32 Subframe installation on Z31
2 posts
• Page 1 of 1
S13/S14/Z32 Subframe installation on Z31
![]() by support » Fri Feb 14, 2014 6:11 am
by support » Fri Feb 14, 2014 6:11 am
As you probably all know by now, I made a subframe swap kit to make life easier, so easy that, all you neeeeed is a measuring tape, a pencil, a grinder, and a welder (with appropriate safety precautions for all of that)
After changing my mind about the reversibility (I'll explain later), the combination I chose for my car consists of 2 pins with U-brackets and two z31 pin sleeves...
Let's start with the rear installation:
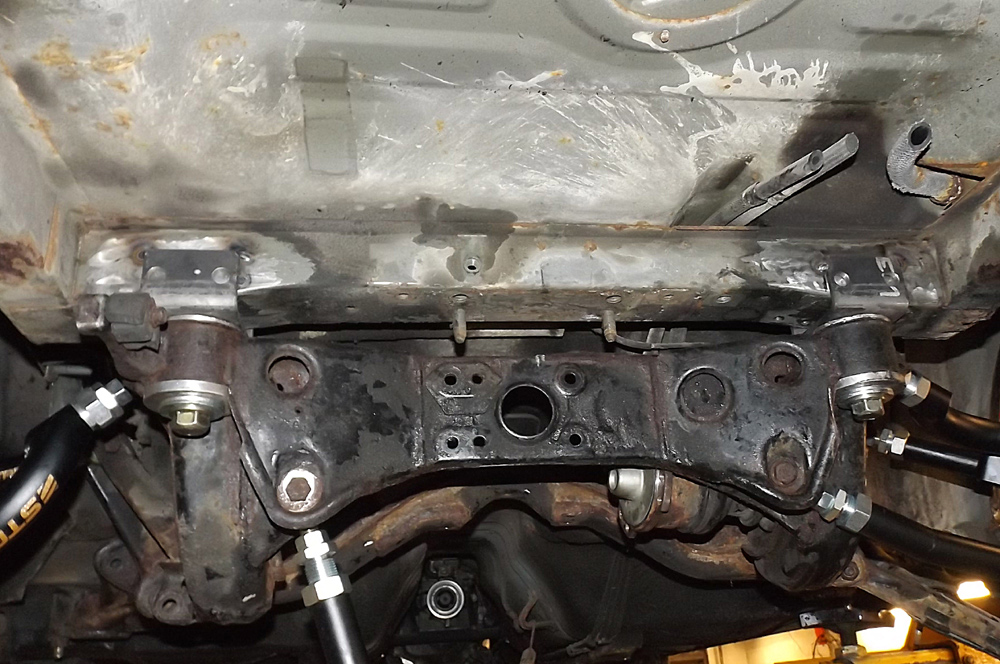
What you should notice here is that each bracket has holes in it, it is entirely possible to bolt the rear U-brackets onto the car prior to welding, or even permanently. However, they don't interfere with anything, so the added stiffness of welding them in just makes more sense. The holes are 14mm btw.
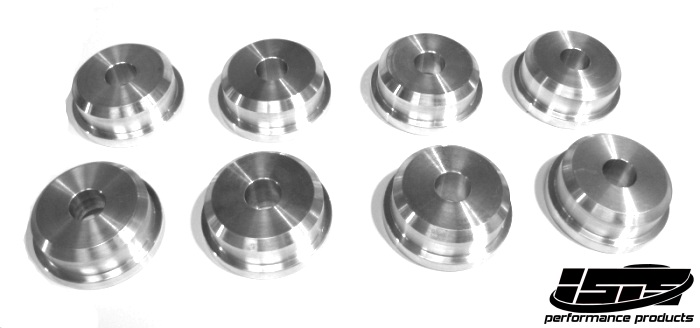
The bushings I used are the two-piece as sold by ISIS, but I got replicas from http://bings.ca since he's local. I then proceeded to have the recessed half heads shaved down to 5mm, and put those on top (normally they go on the bottom, the recess is to allow more thread engagement for the nut, since the fat head spaces the whole subframe down more than stock bushings)
You can see washers installed under the z31 axle-flange nuts, but those were used by the shop to avoid having to tighten those nuts all the way, they are lock nuts, and the hardened threads of the pin are a tough squeeze; they don't have to be there.
The pins with brackets were inserted into the installed subframe bushings, then tightened in the subframe prior to raising into position; the position was found by marking the center of the car, and the center of the subframe, that's it...
Now let's move onto the scary front installation:

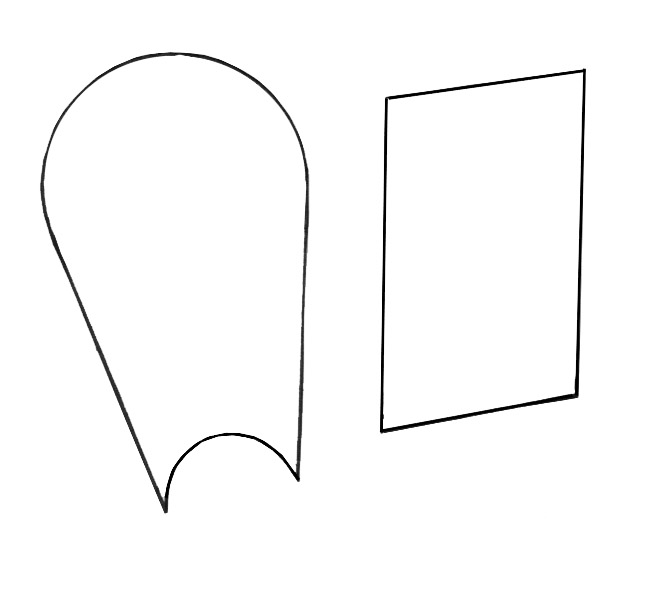
You may think this would be a hugely difficult step, but it's not; the welded plate shape you see is about 3" long, you need one for top, one for bottom, and two rectangles for the sides, that's it. (repeat for other corner)
Bolt the sleeve onto the pin, cut the bushing pod on the subframe halfway through, lift it into place, weld bottom piece and outer side on to connect them, remove subframe, do the other half... the pieces used were cut with a hand grinder from 1/8" steel plate.
In my case,the fabricator decided to bend up the top pear shaped piece to meet the end of the sleeve at the top, you may have seen other writeups that show the sleeves are taller than the subframe pods, so keeping those plates level would have left about 1cm of sleeve protruding above. It doesn't matter which way you do this, the sleeves have 1/4" wall thickness, and using 1/8" plate for the connectors, it is as rigid as the subframe.
-----
At this point I should mention, the non-reversible way to do the front is not anymore difficult, in fact it might be easier...
You'd need a second pair of pins with U-brackets, where you cut off or unbend one side to form an L (unbending will be impossible without carefully making cuts in the corner and rewelding it solid, it's 5mm plate)... just above where the pin needs to be to use the new subframe without modifying, there is a union of two frame sections, they create a corner that the new L bracket would overlap; the newly flattened part would be welded there, while the remaining bent tab would have to be gusseted to the body and frame inside the corner.
If those two-piece solid bushings are used, the fat end would be put on top, with the recessed one on the bottom, as it was designed, because the front pin would sit a little higher than ideal, therefore needs a little spacing down.
The one part I didn't talk about is all the cutting/hammering involved in clearancing the subframe to the body, that's where the real work is, there's a lot of areas that need to be cut and re-boxed to regain strength, doing this will require numerous test fits, raising and lowering the whole assembly... this is probably 70% of the work involved in the swap.
It's easy to see why a shop will charge you more than you think it will cost, it's about $20 in materials, the rest is labour... I've heard estimates from people who have completed the swap, at 14hrs to 30hrs to complete it.
You may need to ask someone who's completed it, "is it worth it?", and I think most of them will say "hell yes" :)
Bushings used (same design):
After changing my mind about the reversibility (I'll explain later), the combination I chose for my car consists of 2 pins with U-brackets and two z31 pin sleeves...
Let's start with the rear installation:
What you should notice here is that each bracket has holes in it, it is entirely possible to bolt the rear U-brackets onto the car prior to welding, or even permanently. However, they don't interfere with anything, so the added stiffness of welding them in just makes more sense. The holes are 14mm btw.
The bushings I used are the two-piece as sold by ISIS, but I got replicas from http://bings.ca since he's local. I then proceeded to have the recessed half heads shaved down to 5mm, and put those on top (normally they go on the bottom, the recess is to allow more thread engagement for the nut, since the fat head spaces the whole subframe down more than stock bushings)
You can see washers installed under the z31 axle-flange nuts, but those were used by the shop to avoid having to tighten those nuts all the way, they are lock nuts, and the hardened threads of the pin are a tough squeeze; they don't have to be there.
The pins with brackets were inserted into the installed subframe bushings, then tightened in the subframe prior to raising into position; the position was found by marking the center of the car, and the center of the subframe, that's it...
Now let's move onto the scary front installation:
You may think this would be a hugely difficult step, but it's not; the welded plate shape you see is about 3" long, you need one for top, one for bottom, and two rectangles for the sides, that's it. (repeat for other corner)
Bolt the sleeve onto the pin, cut the bushing pod on the subframe halfway through, lift it into place, weld bottom piece and outer side on to connect them, remove subframe, do the other half... the pieces used were cut with a hand grinder from 1/8" steel plate.
In my case,the fabricator decided to bend up the top pear shaped piece to meet the end of the sleeve at the top, you may have seen other writeups that show the sleeves are taller than the subframe pods, so keeping those plates level would have left about 1cm of sleeve protruding above. It doesn't matter which way you do this, the sleeves have 1/4" wall thickness, and using 1/8" plate for the connectors, it is as rigid as the subframe.
-----
At this point I should mention, the non-reversible way to do the front is not anymore difficult, in fact it might be easier...
You'd need a second pair of pins with U-brackets, where you cut off or unbend one side to form an L (unbending will be impossible without carefully making cuts in the corner and rewelding it solid, it's 5mm plate)... just above where the pin needs to be to use the new subframe without modifying, there is a union of two frame sections, they create a corner that the new L bracket would overlap; the newly flattened part would be welded there, while the remaining bent tab would have to be gusseted to the body and frame inside the corner.
If those two-piece solid bushings are used, the fat end would be put on top, with the recessed one on the bottom, as it was designed, because the front pin would sit a little higher than ideal, therefore needs a little spacing down.
The one part I didn't talk about is all the cutting/hammering involved in clearancing the subframe to the body, that's where the real work is, there's a lot of areas that need to be cut and re-boxed to regain strength, doing this will require numerous test fits, raising and lowering the whole assembly... this is probably 70% of the work involved in the swap.
It's easy to see why a shop will charge you more than you think it will cost, it's about $20 in materials, the rest is labour... I've heard estimates from people who have completed the swap, at 14hrs to 30hrs to complete it.
You may need to ask someone who's completed it, "is it worth it?", and I think most of them will say "hell yes" :)
Bushings used (same design):
Re: S13/S14/Z32 Subframe installation on Z31
![]() by support » Tue Jan 06, 2015 5:34 pm
by support » Tue Jan 06, 2015 5:34 pm
Here are some templates to use for the connector plates to the front sleeves:
2 posts
• Page 1 of 1
Return to Product Support/Feedback
Who is online
Users browsing this forum: No registered users and 1 guest